Workflows
Enterprise implementation runbooks with exact UI labels, SDK actions, and visual examples from the dashboard.
Workflow guides
Choose the flow that matches what you are shipping
Each flow pairs the dashboard sequence with the SDK calls and screenshots for that setup.
Workflow index
Simple flag
Ship a boolean release toggle and enable it safely in one environment.
Complex flag
Create multivariate string, number, or JSON flags with controlled defaults.
Targeting
Build matcher rules, tune traffic split, and copy a setup between environments.
Progressive rollout
Move traffic in stages, review roadmap steps, and operate lifecycle controls.
A/B experiment
Create a draft, complete design readiness, and start the experiment cleanly.
Workflow
Simple flag
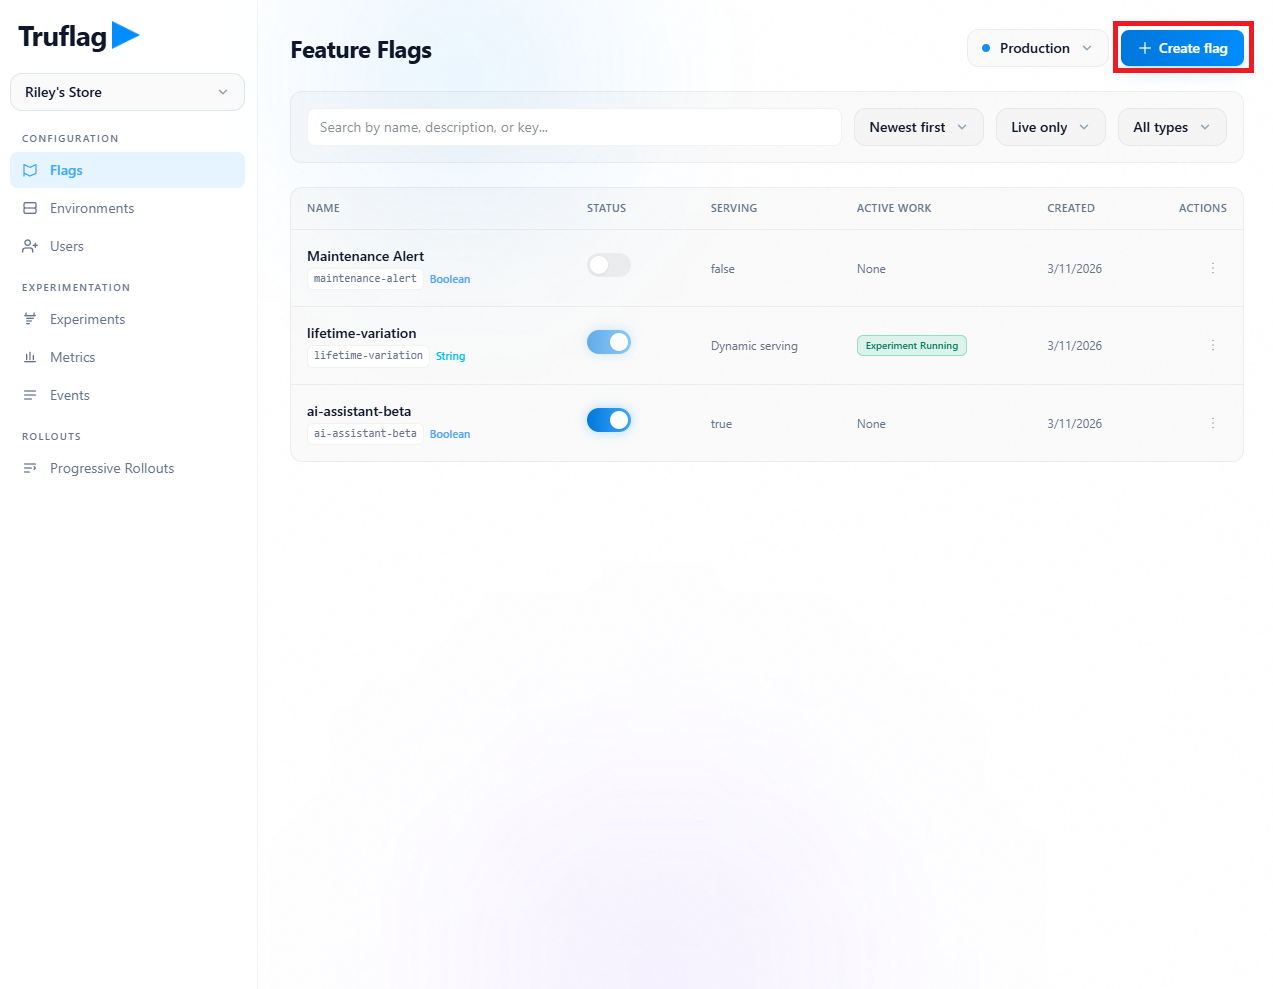
This example walks through a simple release toggle: create a boolean flag, confirm ON/OFF serving behavior, and turn it on in one environment.
Dashboard steps
Open sidebar Configuration -> Flags.
Click Create flag (or Create your first flag if no flags exist).
In Create flag modal set Name, confirm generated Key, keep type Boolean.
In Initial serving behavior, choose the ON default-rule (Default audience) variation and OFF variation.
Click Create flag.
Open the new flag row to enter flag details.
Set ON/OFF state with the header toggle and click Save changes.
For archive lifecycle, use row action menu Archive flag or Reactivate.
SDK guidance
- Configure singleton client once at app startup.
- Read flag with
useFlag(flagKey, false)at rendering boundary. - Call
Flags.login()after auth. - Call
Flags.setAttributes()when targeting attributes change.
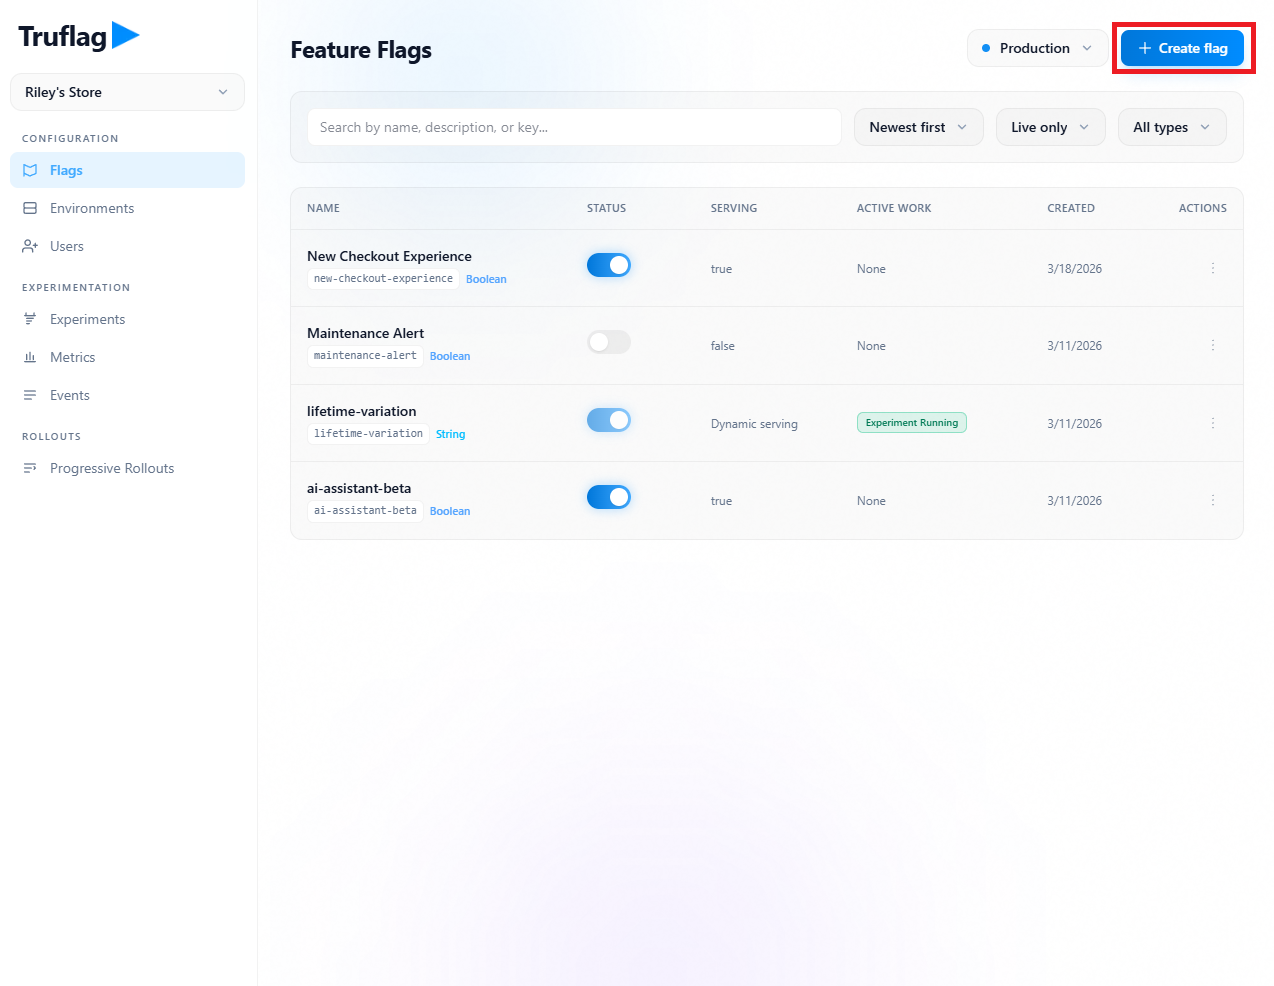
Click Create flag.
1 / 4
Example usage: new-checkout-experience
import Flags from "react-featureflags-client"; await Flags.configure({ apiKey: process.env.NEXT_PUBLIC_TRUFLAG_CLIENT_KEY!, user: { id: "user-123", attributes: { plan: "pro" } },});import { useFlag } from "react-featureflags-client"; const enabled = useFlag("new-checkout-experience", false);Workflow
Complex flag
This example walks through a multivariate flag: create the variations, save the flag, and land on the saved `Homepage Banner` flag before adding audience rules.
Dashboard steps
From Configuration -> Flags click Create flag.
Choose variation type String, Number, or JSON under Variations.
Use Add variation to add options (max 20).
For JSON type, set variation Name and JSON body in the JSON editor.
Set Initial serving behavior ON/OFF dropdowns.
Click Create flag, then open the saved Homepage Banner flag from the list.
SDK guidance
- Read
homepage-bannerwithFlags.getFlag(). - The returned value is the variation selected for the active user.
Click Create flag.
1 / 4
Example usage: homepage-banner
import Flags from "react-featureflags-client"; const homepageBanner = Flags.getFlag<Record<string, unknown>>("homepage-banner", { enabled: false,});Workflow
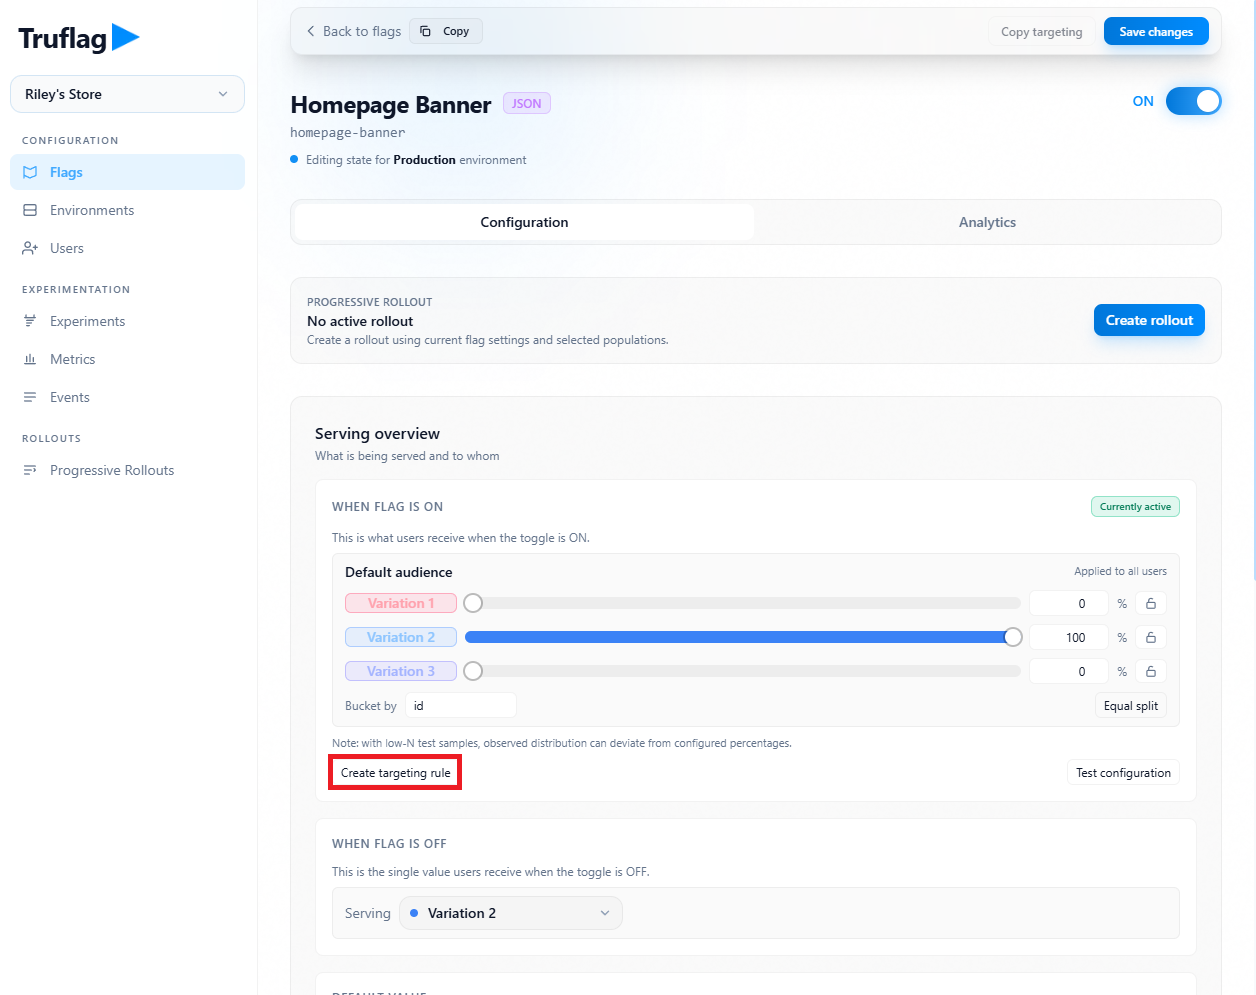
Targeting and environment copy
Targeting assigns different variations to different audiences and can be copied into another environment after review.
Dashboard steps
Start on the saved Homepage Banner flag detail page from the previous flow.
In Serving section click Create targeting rule.
Complete the Create targeting rule modal and click Create rule (or Save rule when editing).
Use per-rule controls Edit rule, Delete rule, Equal split, and Bucket by as needed.
Use Test configuration to validate rule outcomes for identities.
Click Save changes to persist environment state.
To propagate to another environment click Copy targeting, choose target environment in Copy targeting to environment, then confirm Copy targeting.
SDK guidance
- After login, call
Flags.login({ id, attributes }). - When attributes change, call
Flags.setAttributes(). - Rule order matters and is first-match-wins.
Start from the saved Homepage Banner flag.
1 / 7
Workflow
Progressive rollouts
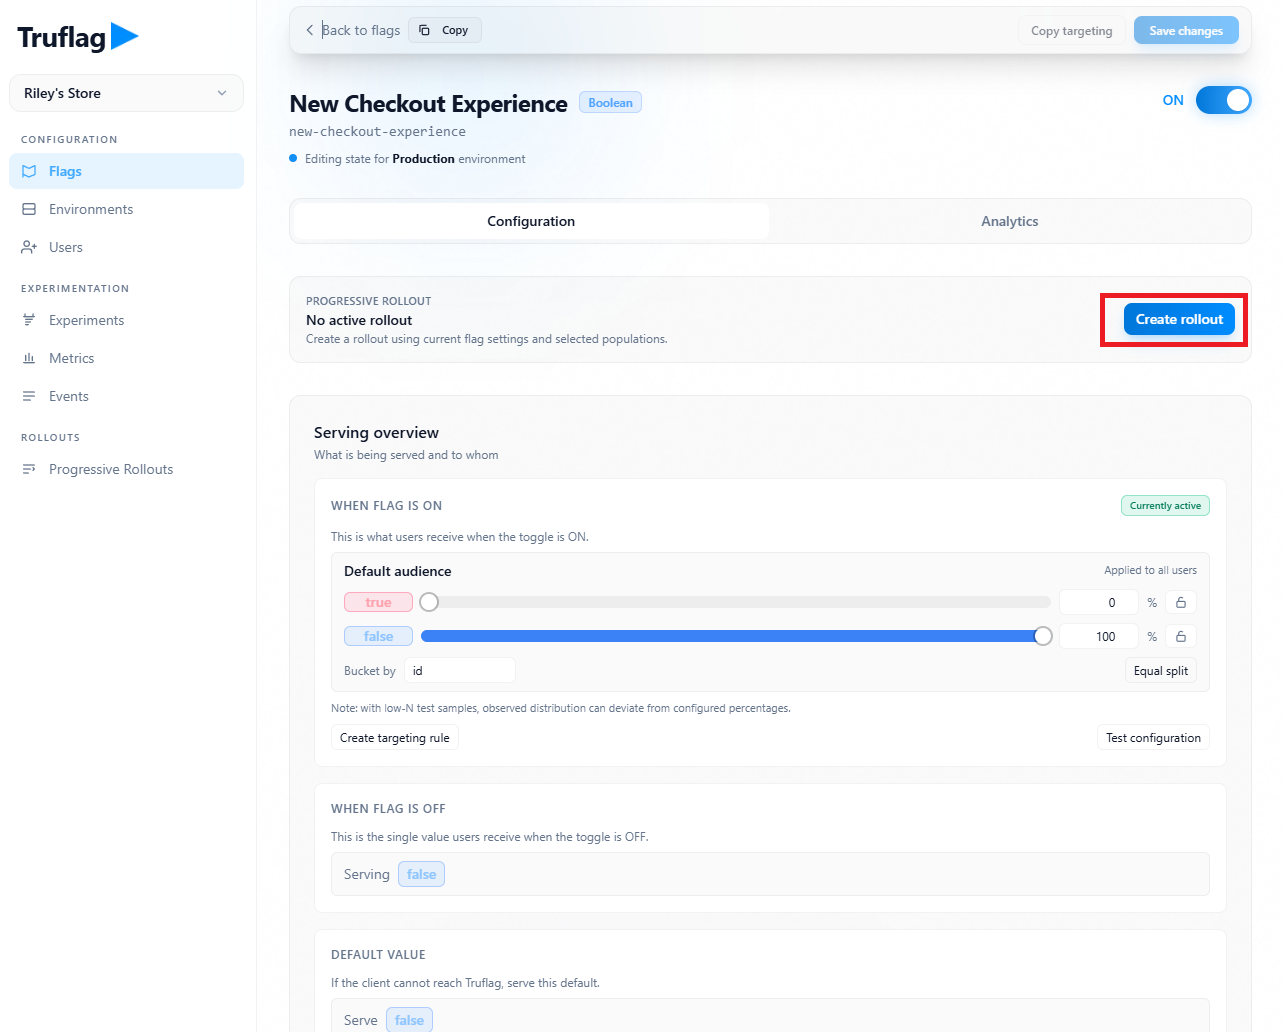
Progressive rollouts move traffic in stages and keep pause, resume, archive, and cleanup controls on the rollout.
Dashboard steps
From a flag detail page click Create rollout.
In Create progressive rollout set Rollout name, select Feature flag, optional Metrics to monitor, and duration preset.
Use Add stage/Remove to tune rollout stages.
Click Create draft.
Open Rollouts -> Progressive Rollouts list to monitor status and current step.
Use row actions menu for Pause rollout, Resume rollout, Archive rollout, and Delete rollout (archived only).
On rollout detail page use lifecycle controls and monitor Monitored metrics + Outcome event keys.
SDK guidance
- Keep reading the same flag key in the app while the rollout runs.
- If
Metrics to monitoris set on the rollout, emit the matching event key from the SDK. - Call
Flags.refresh()on sign-in or app foreground before a fresh read.
Click Create rollout.
1 / 5
Workflow
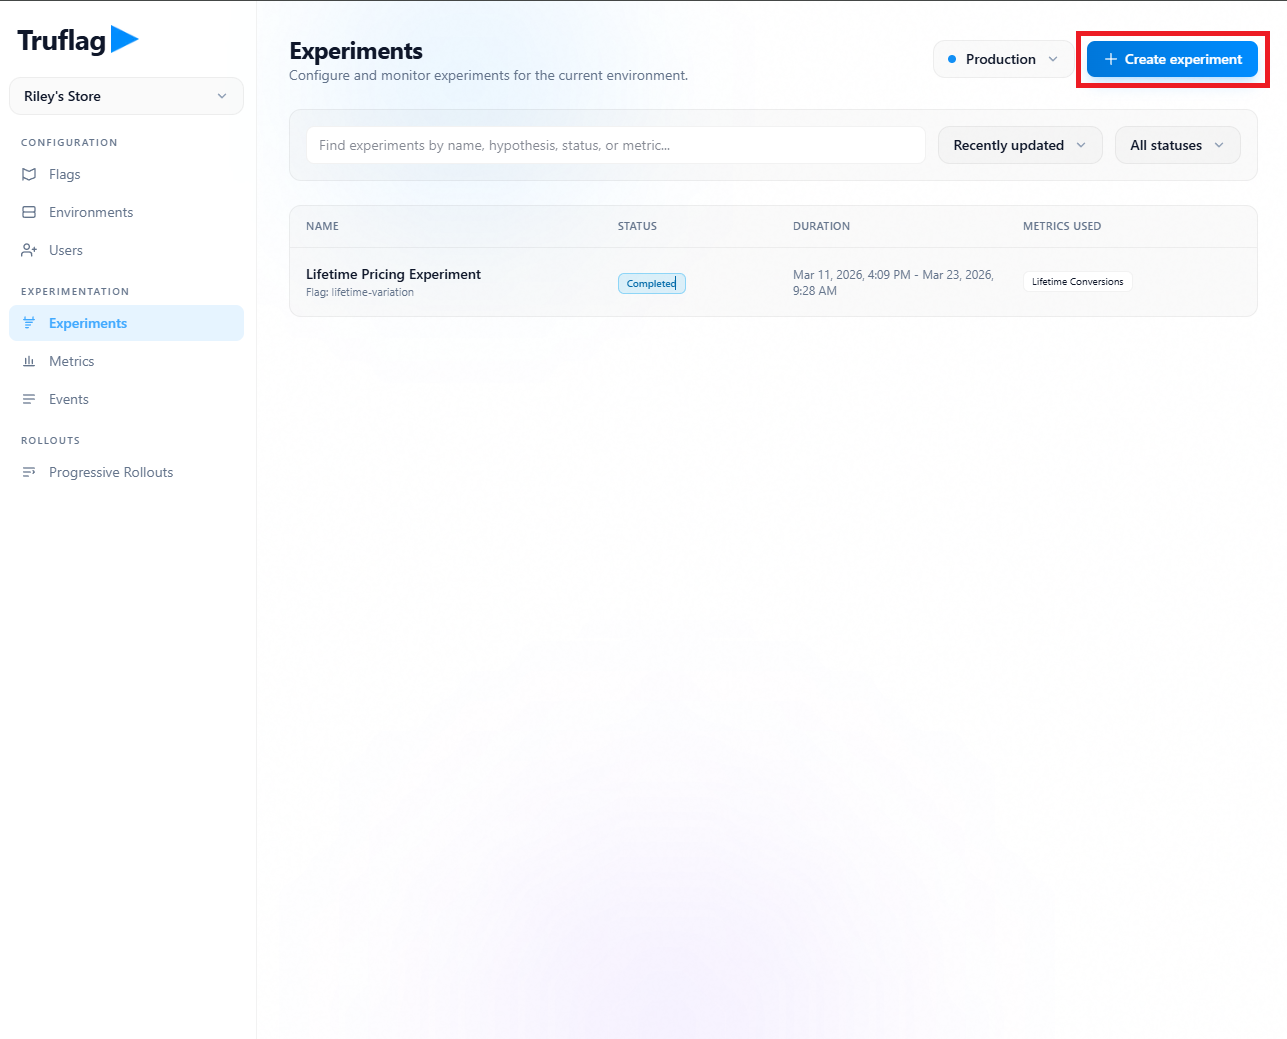
A/B experiment
This example walks from a blank draft to a startable experiment for `New Checkout Experience`, including the inline metric creation flow and the event that metric depends on.
Dashboard steps
Open Experimentation -> Experiments.
Click Create experiment.
In modal fill Experiment name and Hypothesis, then click Continue to details.
On the experiment detail page choose New Checkout Experience in Experiment flag.
In the Metrics section click Create metric, set the metric to Checkout conversion, use event key checkout_completed, then create it inline.
Set allocation, choose the control variation, and decide the outside-experiment behavior.
Choose whether the experiment uses the flag's existing targeting or custom experiment targeting.
Click Save design.
Once Design readiness is complete, click Start experiment.
SDK guidance
- Keep reading
new-checkout-experiencein the app the same way while the experiment runs. - Emit
checkout_completedfrom the checkout completion point. - The
Checkout conversionmetric reads from that event.
Click Create experiment.
1 / 6
Example tracking: checkout_completed
import Flags from "react-featureflags-client"; await Flags.track("checkout_completed", { checkoutFlow: "new-checkout-experience", value: 1,});